
Stone floors are beautiful. They add elegance to any home.
But sometimes, life happens, and cracks appear. Don’t worry, you don’t have to live with those unsightly lines. Repairing cracks in your stone floor is totally doable. You can bring back that smooth, flawless look yourself. Ready to discover how easy it can be?
Keep reading, and we’ll show you exactly what to do.
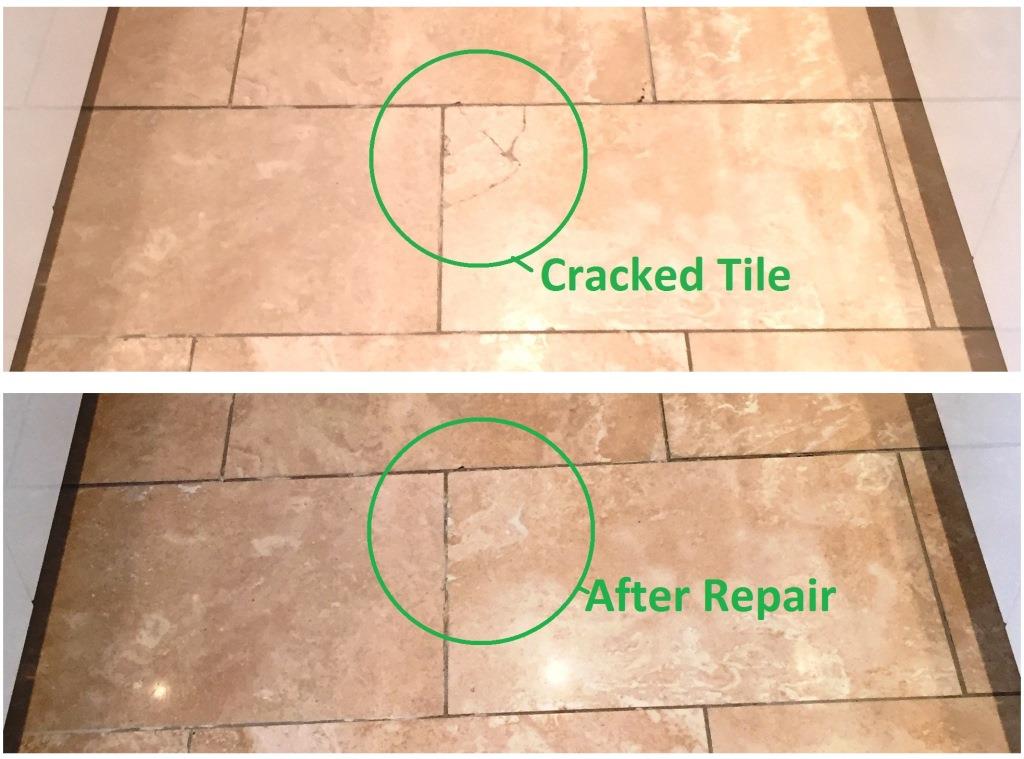
Credit: travertine.tilecleaning.co.uk
Assessing The Damage
Before you grab any tools, take a close look. Proper assessment is key. It guides your repair. Understand the crack first. This step saves time. It prevents mistakes.
Identifying Crack Types
Cracks vary greatly. Some are hairline. Others are deep. Look for simple splits. Check for chipped edges too. Are there crumbling areas? Note the crack’s pattern. Is it a single line? Or a network of fissures?
Determining Severity
How deep is the damage? Run your finger over it. Does it catch? Is the stone loose? A shallow crack is minor. A deep crack needs more work. Consider the crack’s width. A wide crack is serious. Think about the crack’s length. A long crack is challenging. Is the floor stable? Does it move? This indicates a big problem.
Gathering Your Supplies
First, gather your tools. You’ll need a good stone repair epoxy. Also, grab a putty knife and some fine-grit sandpaper. Ensure a clean workspace.
Repairing cracks in your stone floor starts with preparation. You need the right items. This ensures a smooth repair. It makes your floor look good again. Get everything ready before you begin.
Essential Tools
You need a few key tools. A putty knife is very useful. It helps apply filler. A small brush works well too. It cleans the crack. Safety glasses protect your eyes. Gloves keep your hands clean. A vacuum cleaner is important. It removes loose debris.
Choosing The Right Filler
Select a filler carefully. Stone repair fillers are best. They match the stone’s texture. Look for a flexible filler. This prevents future cracking. Epoxy fillers are strong. Cement-based fillers are also good. Read product instructions. Choose one for your stone type.
Color Matching
Color matching is crucial. You want the repair to blend in. Most fillers come in natural tones. You can tint them. Use stone pigments. Mix small amounts. Test the color first. Apply it to a hidden spot. Let it dry completely. Adjust the color as needed. Your goal is an invisible repair.
Preparing The Crack
Preparing a stone floor crack is vital. Good prep ensures a lasting repair. It makes the fix strong. It makes the fix look good. Follow these steps carefully.
Cleaning Thoroughly
Dirt hides in cracks. It stops new material from sticking. Use a stiff brush. Scrub the crack well. Remove all loose debris. Vacuum the area completely. A clean crack is essential. Dust is your enemy here.
Widening Minor Cracks
Small cracks are tricky. Repair material might fall out. A small chisel helps. Gently widen the crack. Make it a bit deeper. Create a V-shape opening. This gives filler a better grip. Don’t go too deep. Just enough for the filler.
Securing Loose Pieces
Check for loose stone bits. These pieces will not stay. Remove them carefully. Use pliers or tweezers. Discard any crumbling fragments. A solid base is key. This prevents future problems. Ensure the edges are firm.

Credit: www.amazon.com
Applying The Filler
Carefully apply the stone filler. Press it into the crack. Smooth the excess filler.
Applying the filler is a crucial step. It’s where your stone floor gets its strength back. This process requires care and attention. You want a smooth, strong repair. This section guides you through it.
Mixing The Filler
You need the right mix. Follow product instructions carefully. Some fillers need water. Others use a special liquid. Mix until it’s smooth. Avoid lumps. The consistency matters. It should be like peanut butter. Or maybe thick paste.
Filling Small Cracks
Small cracks need less filler. Use a putty knife. Scoop a small amount. Press it into the crack. Work it down deep. Smooth the surface flat. Wipe away any excess. Let it dry completely.
Filling Larger Gaps
Larger gaps need more attention. You might need multiple applications. Don’t overfill at once. This prevents cracking. Apply filler in thin layers. Let each layer dry. This builds strength.
Working In Layers
Layering is key for big repairs. It ensures a solid bond. It also prevents shrinkage. Apply a thin layer first. Let it cure for a bit. Then add another layer. Continue until the gap is full. Always smooth the top layer. Make it level with the floor.
Finishing Touches
Small fixes complete your stone floor repair. These finishing touches make the mend look natural. They blend the repair seamlessly.
The final steps make a big difference. They help your repair blend in. You want the floor to look its best. These finishing touches ensure a professional result.
Smoothing The Surface
Once the filler is dry, smooth it. Use a putty knife. Scrape away any excess. Keep the surface level. Avoid high spots. This prepares it for the next step.
Allowing It To Cure
Let the filler cure completely. Follow the product’s instructions. This takes time. Rushing can ruin the repair. A proper cure ensures strength. It prevents future cracking.
Sanding For A Seamless Look
Sand the repaired area. Use fine-grit sandpaper. Sand gently. Blend the edges of the repair. The goal is a smooth transition. The filler should not feel rough. It should match the surrounding stone.
Sealing The Repaired Area
Seal the repaired spot. Use a stone sealer. This protects the filler. It also matches the floor’s sheen. Apply it according to directions. Buff off any excess. This completes the repair. Your floor looks good again.
Preventing Future Cracks
Keep your stone floor sealed. Proper sealing prevents water damage. Address small issues promptly. This stops bigger cracks from forming later.
Preventing future cracks saves you time. It also saves you money. Take steps now. Protect your stone floor.
Proper Subfloor Support
Your stone floor needs a strong base. Ensure the subfloor is solid. It must be level. Gaps cause movement. Movement leads to cracks. Install proper underlayment. This adds stability. It absorbs some shock. Check for settling. Address any issues promptly. A good subfloor is key.
Managing Moisture
Water is stone’s enemy. It weakens the subfloor. Moisture can seep under tiles. This causes expansion. Expansion leads to cracks. Seal your grout regularly. Use a good quality sealer. Fix leaks immediately. Check plumbing. Ensure good ventilation. Avoid standing water. Keep spills wiped up. Dryness protects your floor.
Avoiding Heavy Impact
Stone is durable. It is not indestructible. Heavy impacts cause damage. Dropping heavy objects hurts. Place protective mats. Use rugs in high traffic areas. Avoid dragging furniture. Lift furniture when moving. Consider furniture pads. These prevent scratches. They also prevent cracks. Protect your investment.
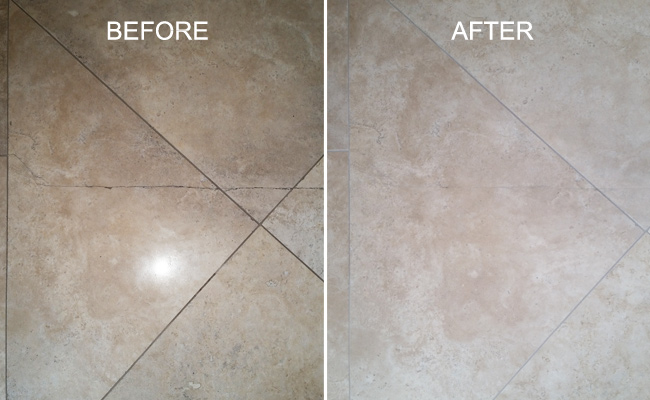
Credit: setinstonerestoration.com
Frequently Asked Questions
What Causes Stone Floor Cracks?
Cracks often happen from impact. Heavy items dropped can cause them. Settling of the foundation also plays a role.
How To Fix Small Stone Floor Cracks?
Clean the crack first. Use a stone repair epoxy. Match the color carefully.
What Materials Are Needed For Stone Crack Repair?
You will need a good cleaner. A stone repair epoxy is key. Color tints are important too.
Can I Repair Large Stone Floor Cracks Myself?
Yes, for some larger cracks. But deep or widespread damage needs a pro. Assess the crack’s size and depth.
How Long Does Stone Floor Crack Repair Take?
Drying time varies by product. Most epoxies set in hours. Full cure can take a day.
How To Prevent Stone Floor Cracks?
Avoid dropping heavy objects. Use mats under furniture legs. Clean spills quickly.
When Should I Call A Professional?
For very deep or wide cracks. If many cracks appear suddenly. A professional has special tools.
Conclusion
Repairing stone floor cracks is achievable. You can fix them yourself. Gather your materials. Follow the steps carefully. Clean the crack thoroughly. Mix the filler. Apply it smoothly. Let it dry completely. Sand the area gently. Your floor looks great again.
Enjoy your beautiful, repaired stone floor. It’s a satisfying project.