A tankless water heater brings hot water on demand, energy savings, and a compact footprint. But for all its benefits, one crucial step often gets overlooked—the condensate drain installation. This part is not just a technical detail; it’s vital for the safe, long-lasting, and efficient performance of your heater. If installed incorrectly, you may face leaks, water damage, or even voided warranties. Many homeowners and even some installers underestimate the importance of proper drainage, leading to costly mistakes down the line.
This guide will walk you through everything you need to know about tankless water heater condensate drain installation. You’ll learn why condensate is produced, what codes and safety rules matter, all the steps for a proper setup, and how to avoid common pitfalls. Whether you’re a handy homeowner, a new installer, or simply want to understand your system better, this article will give you clear, step-by-step knowledge.
Understanding Condensate In Tankless Water Heaters
When a tankless water heater runs on natural gas or propane, it heats water by burning fuel. High-efficiency models—typically labeled as condensing—extract as much heat as possible from the exhaust gases. As these hot gases cool, water vapor in the exhaust condenses into liquid. This liquid is called condensate.
Condensate is not just water. It’s slightly acidic, often with a pH between 3 and 5. This acidity comes from dissolved gases like carbon dioxide and traces of nitrogen oxides, which form weak acids. If not managed properly, this liquid can corrode pipes, harm septic systems, and damage concrete or metal surfaces.
Key facts about condensate:
- Each gallon of natural gas burned can produce about 0.75 gallons of condensate.
- The amount increases in colder climates and with high hot water demand.
- Most tankless condensing units generate between 1–2 gallons of condensate per hour during heavy use.
Ignoring condensate drainage is not an option. Damage from improper drainage is a leading cause of early failure in high-efficiency water heaters.
Why Proper Condensate Drainage Matters
Proper condensate drainage is not just about following instructions. It has several important roles:
- Prevents leaks and water damage: Without safe drainage, condensate can collect inside the unit or leak into walls and floors.
- Protects pipes and building materials: Acidic water can corrode metal and concrete, leading to expensive repairs.
- Meets code requirements: Most areas require dedicated drains for condensate from gas appliances. Failing to comply can result in failed inspections or insurance issues.
- Ensures safe operation: Blocked drains can trigger error codes, shut down the heater, or even cause venting problems.
- Maintains warranty coverage: Manufacturers often require proof of correct condensate management for warranty claims.
Many homeowners only discover these risks after a costly incident. Planning ahead saves money and trouble.
Key Components Of A Condensate Drain System
A condensate drain system for a tankless water heater is more than a simple tube. It usually includes:
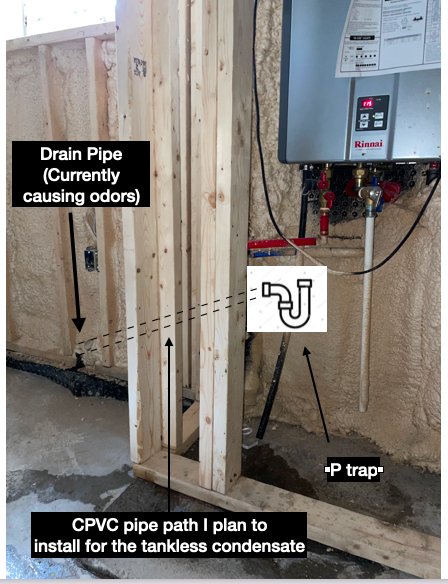
- Condensate Trap: A U-shaped bend that collects water and prevents flue gases from escaping.
- Drain Line: Typically made of PVC, CPVC, or other corrosion-resistant plastic.
- Neutralizer: An optional device that raises the pH of acidic condensate before it enters plumbing or soil.
- Air Gap: A gap between the drain line and the sewer to prevent backflow contamination.
- Pump (if needed): Used when gravity drainage is not possible, such as in basements or remote installs.
Each part has a specific purpose, and skipping or substituting them can lead to problems.
Building Codes And Safety Regulations
Before starting any installation, check your local building codes. While some rules are universal, local codes may require specific materials, pipe sizes, or installation methods. The key standards include:
- International Plumbing Code (IPC): Section 802 covers condensate disposal.
- National Fuel Gas Code (NFPA 54): Addresses venting and condensate for gas appliances.
- Manufacturer Guidelines: Always follow the instructions for your specific heater model.
Common code requirements:
- Use corrosion-resistant pipes (PVC, CPVC, or polypropylene).
- Slope the drain line at least 1/8 inch per foot for gravity drainage.
- Provide an air gap to prevent sewer gases from entering the heater.
- Neutralize condensate before it enters septic or public drains, if required.
- Secure and support drain lines properly.
Violating codes can cause insurance issues, fines, or unsafe conditions. If you’re unsure, consult your local code office or a licensed plumber.

Credit: diy.stackexchange.com
Planning Your Condensate Drain Installation
Good planning avoids most problems. Here are the steps to plan a proper tankless water heater condensate drain installation:
1. Locate The Nearest Drain
Choose a drain that is:
- Lower than the heater outlet (for gravity drainage)
- Accessible for maintenance
- Approved for receiving acidic condensate (e.g., floor drain, laundry standpipe, dedicated condensate line)
Avoid draining into sump pumps, garden beds, or storm sewers unless allowed by code.
2. Decide On Neutralization
If your condensate will enter a septic system, copper pipes, or the ground, you may need a condensate neutralizer. These are simple cartridges filled with limestone or similar media that raise the pH.
Some municipalities require neutralizers for all high-efficiency gas appliances. Check local rules.
3. Choose Drainage Method: Gravity Vs. Pump
- Gravity drainage is simplest and most reliable. The drain line runs downhill from the heater to the drain.
- Condensate pump is needed if the drain is above the heater outlet (common in basements). Choose a pump rated for acidic water.
4. Select Pipe Material
Only use PVC, CPVC, or polypropylene. Never use copper or steel, which will corrode. Use the size recommended by your heater’s manual (usually 3/4” or 1”).
5. Plan For An Air Gap
Install an air gap at the drain connection. This prevents contaminated drain water from flowing backward into your heater.
Example Planning Scenario
Suppose your tankless heater is in the basement, but the nearest floor drain is 10 feet away. The drain is slightly lower than the heater’s outlet. You would use gravity drainage, with a 3/4” PVC line sloped 1/8 inch per foot, and an air gap at the drain.
If the drain were higher than the outlet, you’d need a condensate pump.
Step-by-step Condensate Drain Installation
Let’s walk through a typical installation for a wall-mounted, condensing tankless water heater. Adjust steps if your layout is different, but the core process is similar.
1. Gather Tools And Materials
- 3/4” PVC or CPVC pipe and fittings
- PVC cement and primer
- Condensate trap (may be built-in)
- Condensate neutralizer (if required)
- Air gap fitting
- Pipe hangers or clamps
- Tubing cutter or saw
- Measuring tape and level
- Bucket or towels (for spills)
- Condensate pump (if needed)
2. Turn Off The Water Heater
For safety, turn off power and gas to the unit before starting any work.
3. Locate The Condensate Outlet
Most condensing tankless units have a labeled condensate drain port near the bottom. Check your manual for the exact location.
4. Attach The Condensate Trap
If your unit does not have a built-in trap, install a U-shaped condensate trap directly to the outlet. This trap should always contain water to block flue gases.
5. Connect The Neutralizer
If using a condensate neutralizer, install it after the trap but before the drain line. Make sure it’s oriented correctly and accessible for future replacement.
6. Run The Drain Line
- Cut and dry-fit the PVC pipe from the neutralizer to the drain location.
- Slope the pipe at least 1/8 inch per foot down toward the drain.
- Use pipe hangers every 3–4 feet for support.
- Avoid sharp bends or long horizontal runs.
7. Provide An Air Gap
At the drain, leave at least a 1-inch gap between the end of your pipe and the opening of the floor drain or standpipe. This air gap prevents backflow.
8. Install A Condensate Pump (if Needed)
If gravity drainage isn’t possible:
- Place the pump near the heater.
- Run the inlet tubing from the neutralizer/trap to the pump.
- Pipe the pump’s outlet (discharge) to the approved drain.
- Plug the pump into a GFCI-protected outlet.
9. Secure And Test The System
- Use pipe clamps to secure all pipes.
- Double-check all connections.
- Pour a quart of water into the heater’s drain pan or trap to check flow and leaks.
- Restore power and gas. Run the heater and check for proper drainage.
10. Clean Up And Inspect
Wipe up spills, check for leaks, and make sure all pipes are properly supported and labeled.
Example Installation Diagram
While diagrams are best for visual learners, here’s a simple text description:
Water heater → Condensate trap → Neutralizer → Sloped PVC drain line → Air gap → Floor drain
If a pump is needed:
Water heater → Trap → Neutralizer → Pump inlet → Pump outlet → Air gap → Drain
Comparing Drainage Methods
Not all homes allow for gravity drainage. Here’s how gravity vs. pump systems compare:
| Feature | Gravity Drainage | Condensate Pump |
|---|---|---|
| Cost | Lower (pipe only) | Higher (pump + pipe) |
| Maintenance | Minimal | Pump needs cleaning/replacement |
| Power Needed | No | Yes (electricity) |
| Reliability | Very high | Can fail if pump breaks |
| Best For | Above-grade installs | Basements or remote drains |
If you have a choice, gravity drainage is usually best for long-term reliability.
Condensate Neutralization: When And Why
Many homeowners overlook condensate neutralizers. These devices are especially important if:
- Your home uses a septic system
- The drain pipes are copper or galvanized steel
- Local codes require neutralization for environmental reasons
A typical neutralizer contains limestone chips or similar media. As acidic condensate passes through, the pH rises to a safer level (usually above 6).
How often should you change the neutralizer? Most need replacement every 6–12 months, depending on usage and water hardness. Neglecting this step can lead to pipe corrosion or failed inspections.
Common Mistakes And How To Avoid Them
Even skilled installers sometimes make errors. Here are the most frequent mistakes with tankless water heater condensate drain installations:
1. Using The Wrong Pipe Material
Never use copper or steel. Acidic condensate will eat through these pipes, causing leaks and water damage.
2. Skipping The Neutralizer
If you have a septic system, neutralization is a must. Even on city sewers, it can prevent pipe corrosion.
3. Not Maintaining Proper Slope
A flat or upward-sloping drain line can trap water, leading to blockages, odors, or overflow.
4. Forgetting The Air Gap
Without an air gap, dirty water could backflow into the heater, risking contamination.
5. Poor Support For Drain Lines
Sagging pipes may eventually break or disconnect, especially in attics or crawlspaces.
6. Not Testing The System
Always pour water through the drain to check for leaks or slow flow before completing the job.
Non-obvious Insights
- Condensate can freeze in cold climates. If the drain line passes through unheated spaces, insulate it or use heat tape to prevent winter blockages.
- Neutralizer sizing matters. Using an undersized neutralizer can allow acidic water to reach your pipes, while an oversized one may restrict flow. Follow manufacturer sizing charts.
Maintenance Tips For Long-term Performance
After installation, regular checks keep your system safe and efficient.
- Inspect the drain line every 6 months for clogs, leaks, or cracks.
- Replace the neutralizer media as recommended (usually annually).
- Test the pump (if present) by pouring water into the inlet and ensuring it activates.
- Flush the trap with water to clear debris.
- Check the air gap for obstructions or buildup.
If you notice slow drainage, water around the heater base, or error codes, address them promptly to avoid bigger issues.
Cost Breakdown: Materials And Labor
How much does a condensate drain installation cost? Here’s a general range for a typical job:
| Item | DIY Cost | Pro Install Cost |
|---|---|---|
| PVC Pipe & Fittings | $15–$40 | Included in labor |
| Condensate Trap | $10–$20 | Included |
| Neutralizer | $40–$100 | $40–$100 |
| Condensate Pump | $60–$120 | $60–$120 |
| Labor (Pro) | – | $150–$400 |
| Total | $65–$280 | $250–$600 |
DIY installation saves money but requires attention to detail. Incorrect installs can be more costly in the long run.
Credit: diy.stackexchange.com
Real-world Example: Basement Installation With Pump
Let’s consider a practical example—a homeowner installs a condensing tankless water heater in a finished basement. The only available drain is a laundry standpipe, located 12 feet away and 2 feet above the heater’s outlet.
Steps taken:
- Installed a condensate trap at the outlet.
- Connected a neutralizer canister to the trap.
- Ran reinforced vinyl tubing from the neutralizer to a condensate pump placed on the floor.
- Pumped the outlet line up to the standpipe, with an air gap.
- Secured all lines, plugged the pump into a GFCI outlet, and tested with water.
Results: The system passed inspection, and the homeowner avoided leaks, backflow, and corrosion. Annual maintenance is now scheduled for the pump and neutralizer.
This example shows that with correct planning and execution, even challenging layouts can be handled safely.
Environmental Impact And Disposal
Why worry about condensate? If released untreated, acidic condensate can:
- Lower the pH of soil, harming plants or lawns
- Corrode municipal sewer pipes over time
- Disrupt septic tank bacteria
Neutralizing and draining condensate properly helps protect your property and the environment. Some cities are starting to require pH testing at the drain exit.
For more on the chemistry of condensate and environmental effects, see Wikipedia: Condensing Boiler.
Credit: www.reddit.com
Troubleshooting Common Problems
Even with careful installation, issues can arise:
Condensate Backing Up Or Overflowing
- Check for a clogged trap or neutralizer
- Ensure the drain line slope is correct
- Inspect the air gap for obstructions
Error Codes On The Heater
- Many tankless units will display a condensate-related error if the drain is blocked or the trap is dry
- Refill the trap and clear any blockages
Pump Not Working
- Verify power supply (GFCI outlet, pump plug)
- Check for stuck float switch in the pump
- Replace the pump if it’s over 5–7 years old
Signs Of Corrosion
- Look for blue-green stains (copper corrosion) or rust (steel corrosion) near the drain
- Replace affected pipes with PVC/CPVC and install/replace the neutralizer
Upgrading Or Replacing Old Drain Systems
If you upgrade from a standard to a condensing tankless heater, your old drain may not be suitable. Older systems may lack neutralizers or use copper pipes.
Upgrading tips:
- Replace any metal pipes with PVC or CPVC.
- Add a neutralizer if not present.
- Inspect existing drains for acid damage.
- Plan for a new air gap if needed.
Upgrading is a good opportunity to bring your system up to current safety and code standards.
Frequently Asked Questions
How Often Should I Replace The Condensate Neutralizer?
Most neutralizers last 6–12 months, depending on hot water usage and water hardness. Check the media every 6 months and replace when it looks depleted or your heater’s manual recommends.
Can I Drain Condensate Outside My House?
In some climates, draining outside is allowed, but freezing is a risk. Local codes may prohibit this due to environmental concerns. Always check with your building department before routing condensate outdoors.
Do All Tankless Water Heaters Produce Condensate?
Only condensing (high-efficiency) gas models produce significant condensate. Non-condensing and electric units typically do not need a condensate drain.
What Happens If I Don’t Neutralize The Condensate?
Unneutralized condensate can corrode pipes, damage concrete, and harm septic systems. In some areas, not neutralizing can void your warranty or fail inspection.
Is Professional Installation Required For The Condensate Drain?
While handy homeowners can install a drain, many codes require a licensed plumber for gas appliance connections. If you’re unsure, professional installation ensures safety, compliance, and protection of your investment.
—
Installing a tankless water heater condensate drain is a crucial step for safe, efficient, and code-compliant hot water. With good planning, the right materials, and regular maintenance, you’ll enjoy years of trouble-free service—without the risk of leaks, corrosion, or costly repairs. Take the time to do it right, and your tankless system will reward you with reliable comfort and peace of mind.